Turning Clay into Fine Silver

Turning Clay into Fine Silver
Yes, it is true that you can turn clay into fine silver. How, you might ask, is that possible. It is made possible by taking tiny particles of silver, putting them into a clay medium and heating it to a high temperature of about 1600F using a kiln or a torch. Voila! you have fine silver, a 99.9% silver product. I use this clay to make fine silver jewelry.
The techniques used in making this jewelry are entirely different than conventional jewelry making but once the clay is turned into fine silver conventional metalsmithing tools can be used on the finished pieces. For any jewelry creator working with this clay, known and Precious Metal Clay (PMC) or Art Clay depending on which brand you use, is a completely new experience that can be very challenging and very rewarding.
I am going to take you through the process of creating a pair of earrings using the PMC technique, a journey down jewelry making that I hope you will enjoy taking.

How Do We Begin
A Blob Of Clay is the Way
I begin with a package of PMC Clay, open the package and take out a round flat ball of clay, which can vary in size depending upon how much clay is in the package. In this case there are 25 grams.
Once I take out the clay, which is wrapped in plastic wrap, I gather my clay roller and cutting blade so I am ready to open the package cut off the amount of clay I need and roll it out. It is important to have what I need to create my piece close at hand because metal clay dries quickly and has to be worked while it is soft.

Open, Roll, Cut, Texture
Fine Time for a Deck of Cards
It is time to decide how deep I want my piece to be. All depths for metals clays are measured by using cards from a regular deck of cards. Since piling cards on top of each other on either side of the clay and then rolling can mean chasing your cards all over the place to keep them stacked, metal clay tool makers created a variety of products that can be substituted for the cards. I use a card frame. Each frame has a number on it corresponding to the number of cards that would be used to create the depth of the frame.
I am using a number 3 frame for the earrings I want to make, because I don't want them to be too heavy, but I also don't want them to be too thin because I am going to press a design into them. The texture mat I am using has a swirl design. That texture mat has to be oiled before using it, so the clay will not stick to it. Olive oil can be used but there are a number of other products available that are less messy. Whatever is placed under the clay also has to be oiled for the same reason.
One the clay is rolled to its proper depth using the frame, the texture mat is placed over the frame on top of the clay and rolled until the design is pressed into the clay.

Cut and Shape
But I Have Leftover Clay
The earrings I am making will need two rectangular cutters, one to shape the outside and a smaller one for the inside. Using the textured clay I just created, I place the large cutter in an area about the size I want the earring and press. I then take the smaller cutter and place that in the center and press.
Oh, my I now have lots of little rectangles I don't need from the center of the earrings. Fear not, I have an airtight container in which I place the leftover clay rectangles after I have rolled them in my hand into a ball. I can use that later when I want to make something else. Waste not this clay no matter how small a piece it is, because silver clay is very expensive and every drop counts.

Where is My Hot Plate
I Have to Cook the Clay
I cut four shapes which I then have to harden using a hot plate. I like to hard my pieces before joining them, because they are easier to handle when they are hard and less likely to lose their shape.
I run the risk of cracking the hardened clay if I am not careful, since the heated clay is very brittle. Before placing the clay on the hot plate, I put it on a card. I use the card to place under the soft clay to pick it up while still keeping its shape and then I place the card with the clay on the hot plate. The card will not burn.
I have yet to set fire to the house using any of my metal clay or metalsmithing heating devised, but I must warn anyone using heating elements to make sure you do not forget to turn them off and you do not place anything flammable nearby.

What Happens to the Rough Edges
File and Sand Them Away
It takes about fifteen minutes for the clay to harden depending on its thickness. The hardened clay is ready to be sanded and filed.
There are always rough edges left from cutting and shaping the clay that have to be removed. It is best to remove these pieces before firing the piece, because it is much more difficult to remove them from the fine silver piece than it is from the heated clay state.

Attaching the Pieces Together
Where is my Slip
To create the design I want for my earrings, I place one rectangle inside another and adhere the pieces with metal clay slip. Slip is really very soft metal clay that can be applied with an artist's paint brush.
I wet the brush and dip it in the slip and take enough soft clay out to put into all the seams between the pieces on both sides. The pieces are then heated again on the hot plate until they are hard and completely dry. You cannot place a wet piece into the kiln. It will not fire correctly and you will have an inferior piece of jewelry

Into the Kiln We Go
From the Hot Plate to the Hotter Kiln
The dried clay earrings are placed in a kiln. I have one in my basement. Actually it took me almost a month after I received it to get up the courage to turn it on. That old fear of burning down the house. Since no charring occurred anywhere that I could see, I have continued using it.
The kiln has several programs including a manual one so that it can be set at the correct temperature for whatever you are firing. In this case, the temperature is set at 1500F and the time is one and a half hours. It actually takes three hours to complete the cycle, because the kiln has to het to 1500 and then cool enough so that the piece can be safely take out of the kiln.
If I am in a hurry and the piece is not too big, I can fire it with a torch at high temperature for 2 minutes. Sounds like the better choice. Well yes and no. The piece is stronger if fired in a kiln. If it has parts that have been joined together they will stay that way better if fired in the kiln.

Brush and Tumble
Is it Jewelry Yet
The piece I take out of the kiln is now a solid fine silver piece of jewelry. But it is not ready yet for prime time.
When metal clay comes out of the kiln it has a dull surface that requires brushing to bring out the shine. This is accomplished with the use of a brass brush and Dove dish washing detergent. There is something about Dove that makes it the best product for this purpose. I have to scrub pretty hard to get a nice silver surface.
I recommend putting the brushed piece(s) in a tumbler for an even brighter, smoother finish.

Silver Can Be Too Shiny
Liver of Sulfur to the Rescue
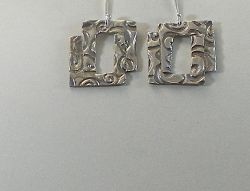
Once it is removed the piece is tumbled for about a half hour in a tumbler. The earrings will come out very shiny. While this is nice, it is not what I want. Shiny silver does not show texture very well, so I use Liver of Sulfur to create a darker area in the recessed portion of the texture which makes it stand out.
To see the difference compare the image in this module with the image in the introduction.
If you are interested in seeing more pieces created using this method, you can view them at

Metal Clay Kits
Getting Started
There are lots of starter kits available. The one pictured is an example. Kits contain what you will need to begin working with PMC (precious metal clay). As I mentioned above, there are two popular metal clays, one is Art Clay and the other is PMC. In my personal experience PMC3 works the best. It stays soft and pliable for longer than Art Clay and it can be reworked without leaving lines and cracks.
All metal clays are expensive because the price of silver has skyrocketed. Usually, a pack of 25 grams of PMC3, the most common type of PMC metal clay for jewelry, will cost about $55.00 in 2012. It is enough clay to make several nice size pendants or quite a few earrings.
The kits usually contain 16 grams of PMC3, which is enough to get you started. I am showing you a basic metal clay starter kit, which will allow you to make several pieces of jewelry using a torch instead of a kiln. This is a great way to decide if you will like working with this medium without making a great investment in supplies and material.
Below is a website with lots of tutorials on how to work with precious metal clay. This site also sells metal clay supplies and products. There are numerous online tutorials that can also help you get started.
Here is the website that sells the kit pictured that also carries a full selection of metal clay products and supplies
Working with Metal Clay - You Can Never Have Enough Books
I have taken more classes than I can count, including metal clay certification classes to perfect this technique. But I always come back to my books to help me through any problems I may have. Next to my tools, my metal clay books are at the top of my have to own list.


