Halloween Pumpkin Pendant

How to Make a Pumpkin Pendant for Halloween
If you want a fun project for Halloween, why not make a pumpkin pendant out of fine silver that can be worn for the holiday?
Since some of the tools used are sharp, this is a project that is not suitable for children. But they can certainly watch you create this pendant and participate in those parts that do not require sharp tools or heat.
I don't usually make holiday jewelry, because it has a time limit on wearability. I prefer to make timeless pendants that can be worn throughout the year. But I have made shamrocks for St. Patrick's Day and thought a pumpkin could be worn through Thanksgiving.
No matter when or if you wear it, this pendant is fun to make and lends itself to your own creativity. You do not have to follow exactly what I do, if you think something else would work better for you.
Photo: Take by Designsbyharriet

Materials
Precious Metal Clay
This pumpkin pendant is made from precious metal clay (pmc), which contains fine silver particles in a clay-like binder. It is an eco-friendly, recycled silver product.
I buy silver metal clay in packages of 25 grams of PMC3, but all you need for this project is a 9 gram package. You will still have leftover clay from this size package.
Professional tools are not absolutely necessary. You would be surprised what you have in your kitchen, toolbox or desk that will work just as well. For example, a large sewing needle works as well as a needle point tool. You may have other items around the house that will do the job, so read this tutorial first and look around your home before you purchase.
For your information, some of the professional tools I used were a clay roller, cutting blade, micro carver, needle point tool, cutters in oval, round and teardrop shapes, and a stencil with two small triangular shapes.

Let Us Begin
Unwrap The Clay
Open your packet of PMC3 and unwrap the clay. Put a small drop of olive oil on your hands and roll the clay into a ball. The olive oil keeps the clay from sticking to your hands.
Lubricate your clay roller with the olive oil. Always use only a small amount. Roll the clay out between three playing cards, placed on either side of the clay, on a lubricated mat.
I used a Helix mat that I purchased at an office supply store. These are also available at hobby stores. I like the Helix mat because it has lines and numbers that are helpful for cutting and measuring the clay. Any surface that the clay won't stick to when lubricated will work.
You will notice in the photo that the ball of clay is inside a frame. The frame is three playing cards thick, but there is no reason for you to purchase these frames. For this holiday fun project just use playing cards. The easiest way to secure the three cards so they don't slip around when you roll out the clay is to scotch tape the top and bottom of each three card set.

Making the Pumpkin
Cutting the Clay
After the clay is rolled out, cut out the shape with a one inch oval cutter.
If you do not have a cutter, draw a one inch oval shape on a piece of paper. Cut out the paper and place it on top of the clay. Using your large needle or a needle tool cut around the paper. Either way works fine.
Take the leftover clay and roll it back up, wrap it with a small piece of cling wrap and put it in an airtight container to keep it soft for later use.
Metal clay dries out quickly. Once the clay is dry, to use it again you have to reconstitute it with water. This can be a messy and wasteful job, so it is best to protect it before it dries.
In the photo shown here, the blade on the left is what I used to cut the clay from the package before I rolled it into a ball. If you need to cut the clay, you could use a razor that has one protected edge. Lubricate the blades, whichever blade you use, to keep the clay from sticking to it.

Designing the Pumpkin
Making the Face
Before I started on the pumpkin's face, I cut an indentation in the top of the pumpkin where I will put the stalk, that will also be the bail, using my needle tool. I cut this opening freehand, so be careful not to make it too big. It should be about 1/4 inch wide and not too deep.
For the face, I used a ruler to make sure the eyes would be in the same spot on each side. I put a dot on the clay with my needle tool to where I wanted the center of the eye to be. Use the photos as your guide.
After making sure the dot was equal from the edge on both sides, I selected the next to the smallest triangle on my template and placed it over the dot so the dot is in the center of the triangles. I cut out the triangles with my needle tool.
Then I put a dot in the center where I wanted the nose to be and using the smallest triangle on my template I did the same thing as above to cut out the nose.
Finally, I used my smallest circular cutter to cut out the mouth, first making the dot and then cutting.
Now, you do not have to use this design or these tools to make it. I am showing you how I did it. You can draw the eyes, nose and mouth on a piece of paper, cut them out, and place them on top of your clay and cut with your needle. I took what was the easiest way for me, since I have the template and the cutters and am not that good at drawing.
Creating the Face - In Photos
Click thumbnail to view full-size


Making the Stalk
For the Bail
Once I finished creating the facial features on my pumpkin pendant, I started on the bail.
The best way to do this is to roll out the clay again and cut a 1/4 inch wide by 3/4 inch long strip. I start by cutting it longer and then measuring it and cutting it again. I think it is easier to work with a long strip then to try to cut a specific size strip, particularly if it is small.
Take a plastic straw cut it to about a third of its size and lubricate it. Place your cut clay strip around it and lightly pinch it at the end to just hold it together. Don't seal it tight, because I want to place one end on the front of the pumpkin and the other on the back and then attach it. You want it to dry close together so you don't have to bend it too much and break it when you put it on the pumpkin,
Place it on a hotplate to dry. I use supports that are made to stand the heat, but you don't have to. You can place it on a playing card and then put it on the hotplate. The hotplate I use is a coffee warmer. It's cheaper and it is all you need.
If you do not have a hotplate, all the pieces will have to sit overnight to dry before you can go any further. Not a big deal, since there is plenty of time before Halloween to create it and wear it.
Stalk/Bail on Straw


Making the Leaf
Optional But Cute Addition
The leaf is absolutely optional. If you want to get to the finished pendant, then skip this part, but I think it adds a nice touch to the pumpkin.
Again I used a cutter to create this, but you will do much better, and save a lot of filing and shaping if you can draw a small leaf, about 3/8 inch, on a piece of paper. Using the paper cutout as your template you will already have it the right shape.
I had to sand my teardrop to create the little curve at point to make it look like a leaf. You talented artists out there can save time by drawing it yourself. Look at the photo and you will see the teardrop shape will not do for a leaf unless I do some sanding to redesign it.
Dry the leaf on the hotplate on top of a playing card or overnight with the other pieces. The reason we dry everything before attaching it is that the pieces retain their shape and it is much easier to attach them.
The playing card makes it easier to move the pieces to and from the hotplate without touching them.
Hotplate (coffee warmer) with Playing Card
 with Playing Card")

Attaching The Pieces
Putting the Pumpkin Together
Attach everything by wetting the pieces with a small wet paintbrush, putting them where you want them on the pumpkin base and moving them back and forth until they stick where you want them.
The pieces are adhered correctly when they cannot be moved. You may need to add water or slip (which is very softened clay), but I don't think you will need the softened clay for this project.
For your information, you can make slip by taking a small piece of clay and adding water to it until it has a soft consistency that can by brushed onto your piece.
I attached all the pieces then sanded them to the shape I wanted. If you drew the shapes and you are satisfied with how they turned out you will have very little sanding to do.
Use small squares of 400 grit sandpaper and/or an Emory board. Smooth out all the cut edges and around the pumpkin so that everything is smooth. To make the rounded part of the pumpkin really smooth, put a little water on the tip of your finger and after sanding go around the edges with your wet finger.
I added curved indentations on the surface of the pumpkin. You can do this with a clay engraving tool or your needle, but if you use the needle go back and forth and up and down a few times to create a shallow groove.
Be very careful when pressing into dry clay. You do not want to break it. It is best to repeat the process rather than cutting too deeply and breaking your dry clay.
Dry clay is called greenware, a term for clay pieces before they have been fired.
Dry Clay - Greenware Including Attachments


Ready for Firing
Use a Creme Brulee Torch
Don't forget to dry the clay completely before firing by putting on the playing card and then on the hotplate for about 15 minutes. Otherwise, wait for everything to dry overnight.
This piece is perfect for the creme brulee torch. If you want more information about this torch see my jewelry torches lens
I use a tripod to bring pieces up to my height, but you do not need one. Put your piece on a solderite board. You will have to purchase one of these boards, because they are heatproof and burn proof, and you don't want to heat your piece on anything that will burn. I also like to have a square piece of steel underneath my board to protect whatever surface I am heating this on. The steel can be purchased at a hardware store. Buy the smallest size. The solderite board can be purchased at Amazon or online metal clay supply stores and some beading stores. It is also possible to find it at a hobby store.
Follow the instructions for using the torch in my jewelry torch lens jewelry torches lens You will be heating your clay piece for two minutes with the torch on high.
Be very careful to keep the torch moving and high above the clay. You want the clay to turn slightly pink, but if you heat too close or let the piece get too hot the silver will melt. I know, I have done it before. Better to be safe than sorry. Set a timer for two minutes and stop when it goes off.
At first the clay will flame. Not to panic that is what it is suppose to do when the clay binder is being burned off. Wear goggles and an apron which will keep any stray clothing out of the way.
When the piece is fired, it will be very hot. do not touch it. Use a long tweezers to pick it up then put it in water. It will fizz a little at first.
Using a wet brass brush with a drop of Dove dish washing detergent, brush the surface until it shines. After firing the surface of your silver has a dull almost white cast. Brushing it will bring out the shine.
You can tumble the silver pumpkin in a tumbler to give it a high shine. Tumbling also makes the silver stronger, but this step is entirely optional, even more optional with this particular piece because we are going to add color.
Clean and Polished Pumpkin Pendant


Adding Color
Or Leave the Pumpkin Silver
I don't think this pumpkin is ready for prime time without color. But you can stop here and put your pendant on a chain and wear it, if you are satisfied. Color is optional.
I colored my pendant with Pebeo Vitrea 160 liquid enamel. The colors I used were amber (17), aniseed (38) and orange (31). and ink black (19) for the grooves, if you created them.
Use thin washes of color so a hint of the silver shows through on the body of the pumpkin. The rest can be darker, but the body looks great with a little silver showing through.
Using a flat soft natural bristle number 2 watercolor brush, first paint the grooves black, then the body orange, the leaf aniseed which is green, and the stalk/bail amber which is brown. Clean your brush well with water and wipe it with a paper towel until no color comes off the brush before changing to another color.
Let the colors dry overnight and bake the piece in an 325 oven for 40 minutes to make the color permanent.
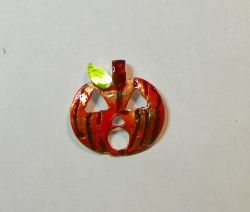
Completed Halloween Pumpkin Pendant with Color

Supplies - Remember Look at Home First
You do not have to purchase the large set of Pebeo Vitrea 160 colors for this project. I am including it just to show you. There are other less expensive packets of this enamel on Amazon.